Friday, October 10, 2014

Thanksgiving table

Hi all and Happy Thanksgiving to all my fellow Canadians. That's right folks. Here in good old Canada, we celebrate the holiday much earlier and as a result we are all much more sane, calm, and reasonable at Christmas.

Anyway, I got inspired the other day by a trip to Pier 1 and decided I could do just as good a job with table decor  for a much better price.

I headed home and created these great little treat box/place cards and napkin rings to match.

First, using the box maker from Stampin'Up! and some retired extra heavy designer paper, I made the little 2"x2" boxes. Each one holds two Lindor chocolates perfectly. I wrapped them with burlap       ribbon using a hot glue gun, then continued with the glue gun adding fall colored leaves from an            inexpensive garland (Michaels) and a pine cone from my own yard.                                                    

A note here about the pine cones. They were a bit damp and closed up when I picked them up, so I decided to Put them into the microwave for 2 minutes. This solved three problems. I dried them out, opened up the individual 'petals' and killed any tiny bugs hiding inside them. You can see the before and after here.                                                                                                                                      
 I used the same burlap ribbon to make the napkin rings. I added some bronze colored  wired                net/ribbon, then went on to add the same leaves and pine cones.  That is pretty much it. Very simple
but quite effective and so much less expensive than the store bought version.                                      


Thursday, October 2, 2014

A moose is loose in the hoose.

That was my husband`s comment when he saw this card. It is a line from a recent episode of the TV series, Mrs. Brown`s Boys. Apparently, according to Mrs Brown, this is how Canadians talk.

Anyway, I attended a needle craft and scrap booking fair last weekend and purchased this cute little fellow that is one of a series of stamps by Sue Coccia called Animal Spirit Stamps. I had the opportunity to make a card using the frog from the same series, but chose to purchase the moose because we have these guys passing through our yard on a regular basis.


I stamped him on white cs (4 1é4 x 5 3é4) with cocoa archival ink. I also stamped him randomly around the outer edge of another piece of white (5 1é4 x 6 3é4). Then I applied Rusty Hinge distress ink with a sponge applicator to both layers in circular motion from the outter edges inwards, leaving the top mat lighter towards the middle. I used the same treatment on a 3`x1 scrap of white cs and stamped the words from a retired SU set. Finally, I darkened the edges with Walnut Stain distress ink and the sponge. The cs for the mat and card base (5 1é2 x 7) is Cajun Craze from SU, also distress with Walnut Stain.

The frayed burlap ribbon is from SU, distressed with the Ranger ink, and the brads are from my stash. This will be a great card for a male birthday. I will be making more of these and will probably have to keep a list of who I give it to so that I don`t duplicate!!

Friday, September 19, 2014

Babies, Babies Everywhere

It is true. I have four baby arrivals coming up that I need cards for. So I was thrilled to get my hands on the Sweet Lullaby paper collection by Heartfelt Creations recently. I also purchased the Sweet Lullaby, and Once Upon a Time dies, and the Sweet Lullaby Sentiments stamp set, all also by HFC.

These 4 cards came together so easily with all these coordinating products. All I had to add was some ribbon and buttons from my stash.


Then, I created the inside sentiment on my word program and printed it four times. All the cards are the same inside except for the color of the mat. Oh yes, and I made that `Little Angel` tag on the green card front. So that is it; four baby cards ready to go out. Easy Peasy, as they say. 

By the way, I just love the Sweet Lullaby die and am hoping for more opportunities to use it.


Wednesday, September 17, 2014

A Day Spent with Genius

It has been a crazy summer around here with a hugely disruptive house reno that is still on going. I have done a bit of crafting outside the home but not much here in my own little cave. I will show you two projects that I built while attending a workshop with Finnabair at a paper arts store in my area.

I followed Finnabair's directions very closely on these two pieces; they look very much like her work and not so much something of my own imagination. However, I love the results and am looking forward to doing more mixed media work of my own. I have a couple of ideas percolating in my head and hope to get at them soon.

Meanwhile, here is what I did with the grand master herself. You can to see more of Finnabair's work here. She is true genius.


This piece is done on an 8"x8" stretched canvas. It is incredibly 3D and I really love the ombre color 
palette. That feature is a true Finnabair signature style. Almost all of the embellishments used here    
are Prima Finnabair products. There are a few random buttons, etc. The coloring is done using white   and black gesso, and then a combination of sprays made with Luminarte Primary Elements, and Silks   acrylic paints, also by Luminarte.  The photo in this project is my sweet grand daughter, taken 6 years ago. 


 The base of this project is two 12x12 sheets of cardstock distressed and layered. Then several treatments and embellishments were applied. I won`t go into details because this is not my work, but Finnabair`s. We used lots of Prima products here, and some random lace and buttons.

You can see the wonderful layers we created and the gorgeous sheen and texture in these close ups.
When I got home, I treated a 12x12 stretched canvas with some Silks and Primary Elements to match the project, then attached my finished piece to this canvas with some gel medium. This was all so thatI could hang it on my wall. This picture is of my amazing daughter.                                                                              


Tuesday, February 11, 2014

Just Cork It

I spent a lot of time surfing the internet one day and came across a card that really inspired me. Foolishly, I did not tag the site or otherwise make note. Now, I wish I could remember the blog where I got the inspiration for this card so that I could acknowledge the talent. If anyone knows to whom I am referring, please leave a note below and I will be sure to add the information to my post.

The main thing that caught my eye was the cork that was used. As soon as I saw it, I knew that was what I wanted to incorporate into this card for my son's birthday card.


The mystery card used some of the new printed cork card stock from DCWV. I had some plain cork c/s here and decided to add my own pattern to it. I pulled out a couple of layering stencils from Stampers Anonymous (Harlequin and Clockworks) and sponged on 3 colors of Ranger distress inks to create the pattern on the cork and inside the card. Then I used the darkest ink color (Walnut Stain) and sponged the outer edges to distress the panel.


I stamped the greeting on some more cork, die cut the label, and sponged on some more ink while the label was still in the die. From a different color of cork c/s, I die cut a mat and distressed the edges of both with Walnut Stain ink.


I decided I needed something lighter to pop the label, so I found some mottled beige c/s that I have had in my stash for years (decades even), traced on it with a pencil around the largest die, then hand cut  the label and distressed the edges with the medium ink color (Vintage Photo).


Finally, the ribbon is from SU and I sponged on some Rusty Hinge ink to soften the starkness of the ivory. An SU large bronze brad and Ideaology pin holds it all together. I added that and the Tim Holtz elements to the label, and used foam tape to attach it all to the card front.


I lam pleased with how this card turned out. Very testosterone. Thanks to my mystery inspirational artist. And to my boy, who is an amazing son, husband, father, and telecommunications expert, I send a big Happy Birthday. Love ya kiddo.

Stamps: JRS Grand Birthday Sentiments
Papers: Recollections ivory card base; natural and rust colored  cork c/s - unknown; mottled beige c/s REALLY unknown!
Inks: Tim Holtz Ranger Distress Walnut Stain, Rusty Hinge,  Vintage Photo
Dies: JRS Vintage Labels and Banners
Other: SU brown and ivory striped ribbon; Tim Holtz for  Ideaology metal findings; SU large metal bronze brad; Tim  Holtz for Stampers Anonymous layering stencils Harlequin and  Clockworks.


Tuesday, February 4, 2014

Majestic Morning

I know you have all be waiting with baited breath for my first creation using the newest Heartfelt product line called Majestic Morning. LOL

I was practicing my flower shaping skills this morning using the new die and coordinating stamp, and following the great video Emma Lou has on her blog here.


My first step was to create my die template so I grabbed some gold/tan card stock that I have lots of and cut the template. When the blossoms popped out, I decided I liked them so much, I continued cutting until I used up the whole 12" x 12" c/s. It is funny how some cards come together that way.

I sponged some Carmine red 3D stamp paint on the edges of each petal before shaping them. It adds a wonderful shimmery touch to the finished product. I also sponged some 3D paint on the sentiment. Added a  glob of Dries Clear glue in the center of the two larger flowers and drop some brown gala glitz. Shook off the excess and let it dry. This adds another bit of glitz to everything.


Stamped two images with the stamp from Beautiful Juliet, then cut the circle from one image and the 'thinking of you' strip from the second; then layered the strip through the circle. I also used a panel from the Majestic Morning paper package. Yup, HFC came out with yet another great paper collection, and I love the colors in this one. They are so bright and cheery and the panels make card creating so easy.


Now I have to get back to my flower shaping practice. I think it is a skill I will be needing when I work the HFC booth in Mesa in March.


Stamps: HFC Beautiful Juliet.
Dies: HFC Sweet Juliet and Majestic Blooms.
Papers: HFC Majestic Morning collection, SU White, Bazzil green and golden rod.
Inks: Ranger Distress Rusty Hinge, Ancient Page black, Viva 3D Stamp paint carmine red.
Other: Art Institute Dries Clear glue, glue dots, HFC blossom shaping tools and mat, Gala Glitz brown


Friday, January 31, 2014

...Makes Me Smile

So in my last post I said that the card 'makes me smile'. Ironically, those exact words appear in the sentiment on today's card.


I want to acknowledge Audrey Hiltke and her amazing blog. I cased her card here as best I could although without a gold leafting pen, it is not quite the same. Of course, I did not have some of the other products either so I substituted but I am quite pleased with the result all the same.

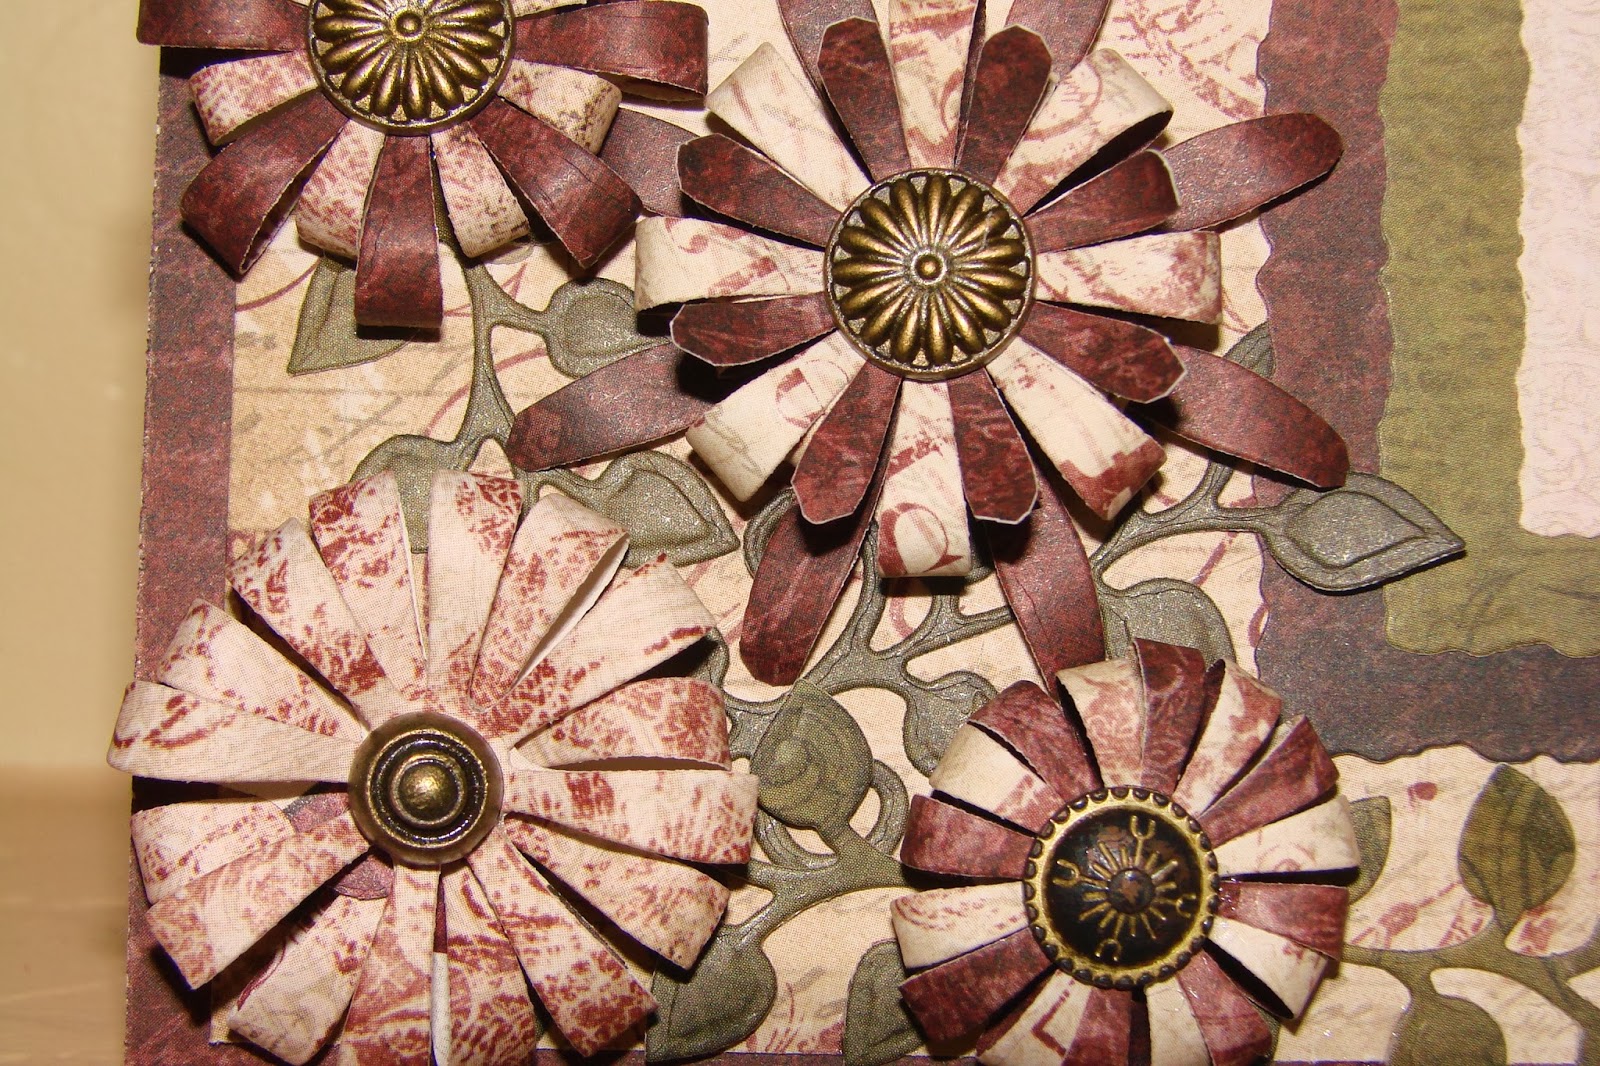
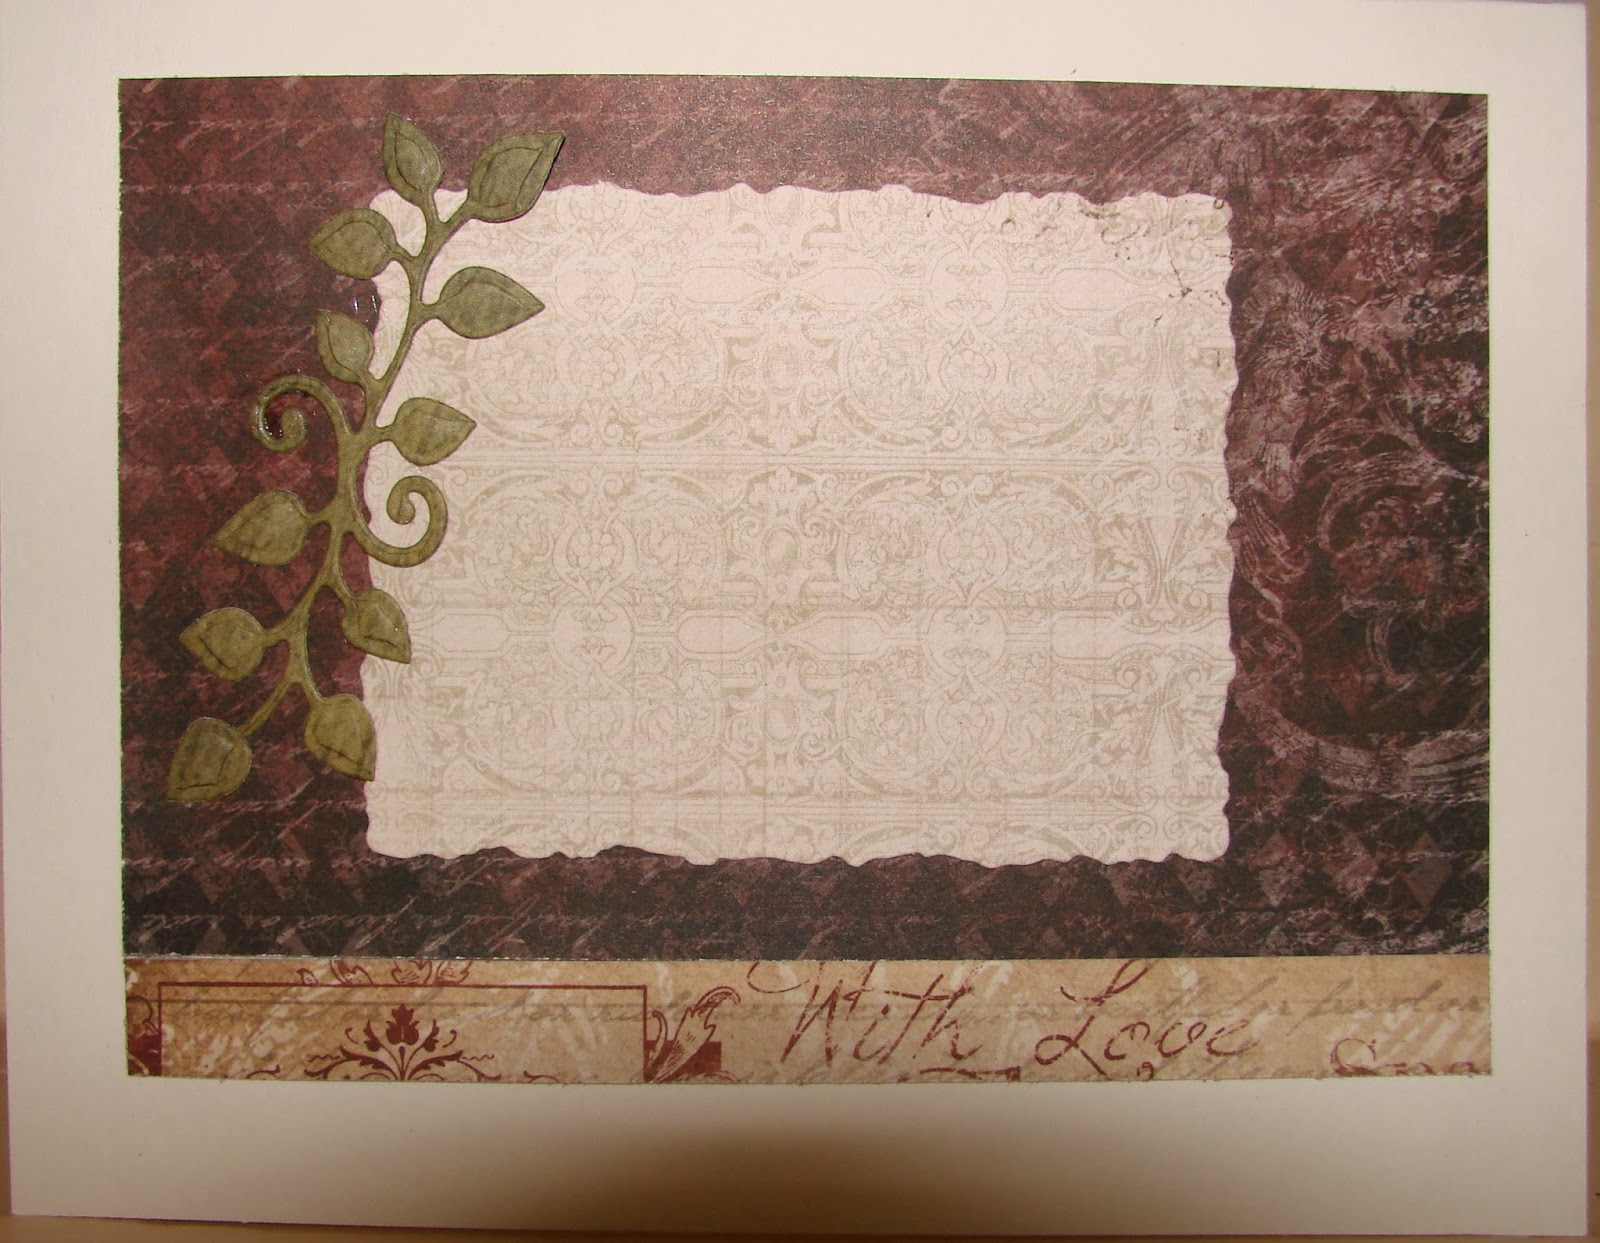
I used the Grand labels four and cut 3 of the third largest die from white c/s. Two of them were from a heavier weight c/s for stability. Then I dry embossed the lighter weight of the diecuts, used a Versa Mark pen around the edges, and heat embossed with gold detail EP. It was then adhered to one of the heavier diecuts with my AGT adhesive.  I scored the third die cut about 1" from the top and adhered the 1" area to the back of the embossed double layer. I used red sticky strip to ensure the two layers would not come apart. This created the back of the card.

I stamped a design several times on white c/s in three different colors and then die cut 4 hearts from each color. I edged each heart with gold encore ink by running the edge of the heart across the pad. Then I heat embossed with gold detail EP. I shaped the hearts with the HFC blossom shaping tools and pad, and attached a foam square to the back of each one.


I die cut a sentiment label with the Labels four die and used the same treatment to edge it. Then I stamped the JRS sentiment, heat embossed with gold EP, and attached the label to the front of the card with foam tape.

I began layering the shaped hearts on top of each other. I saved a couple, unshaped, for the inside of the card.

The person who makes me smile is my amazing daughter, whom I get to see far too seldom as she lives quite far away and is always incredibly busy. I am so proud of the wonderful person she has grown to become. ILYTB kiddo.

That is the second of three Valentines I need to get made. This one is off in the mail to Canada as well.


Hope you all have and inky day.


Stamps: JRS Grand Clear Sentiments, Cloud Nine Designs (name of set unknown - this is what I used for the hearts), a stray Valentines Day stamp from my stash.
Papers: SU white c/s, Heavy weight c/s from my stash
Dies: HFC Timeless Amour, SB Grand Labels Four, and Labels Four.
Inks: VersaMagic turquoise, pumpkin spice, green, Encore gold, Versa Mark pen.
Other: SB Asian M-Bossabilities, SU gold detail EP, Foam tape and dots, SU sticky strip (red tape), Heat gun, HFC blossom shaping tools and pad.


PS You may have noticed by this time that I have a rather large 'stash' and lots of 'unknown' products. It is something I have to work on reducing. I have found a new blog that seems geared for me and others like me who have this problem. It is called Craft Hoarders Anonymous and I can't wait until it is going full gear. Check it out here.


Monday, January 27, 2014

I Heart This Color Combination

Good morning everyone. I have a creation today that just makes me smile.


I still had all these papers on my work space from last week when I was working on the JRS color challenge. I was about to put them away when it occurred to me that they would make a perfect Valentine. As I needed to get one made up quickly to get into the mail back to Canada, this is what I came up with.


It is pretty straight forward. In addition to being flat (easy to mail) and cheerful, I also like the unusual  colors for a Valentine. The little hearts on the front and inside of the cards all were die cut from the center of one of the larger dies in the set.

 I am pretty sure my grand daughter will love this one.


Get busy making those Valentines. The day will sneak up on you before you know it. Have a great day and get your fingers inky.

Stamps: an unknown stray from my stash
Papers: Graphics 45 Secret Garden, Bazzil peach, blue, and red c/s , SU white c/s.
Dies: SB Lace Hearts, HFC Timeless Amour, Decorative Lace Border, and a retired set (the two corner dies).
Inks: Ranger Distress Fired Red Brick


A Little Rusty

I had some extra time today after my 3 hour golf lesson and before picking up my husband at the airport so I threw this little number together.


I jest, but actually, this one did come together very quickly. I had purchased the lace and flowers together a couple of weeks ago and had them laying on my work space waiting for my inspiration. I pulled out my packages of Heartfelt Creations papers and came up with one from the Antiquity collection.


I think this card took about 45 minutes to design which is some kind of record for me!  :)   I had one flower leftover from the package and already have the next card started in my head. I may have to pick up some more flowers in this color, which I just love, as I have a couple of other color combinations I want to try. And isn't this crocheted lace just gorgeous?


Stamps: Grand Birthday Sentiments
Paper: HFC Antiquity Collection, ivory and rust  c/s papers from my stash.
Dies: SB Labels 8 and Decor Labels 8
Inks: Color Box brown, VersaMagic Jumbo Java
Other: Petaloo flowers and lace


Tuesday, January 21, 2014

You Learn Something New Every Day

I decided I wanted to take another run at the JustRite Stampers challenge #112. Just to remind you, it is a colour challenge as seen in this photo.

JRFC112

And this is my second card using these colours.


So what did I learn that was new, you ask. Well I was not sure if it would work, but I decided to try using a Spellbinders die to cut through two layers of card stock. Lo and behold, with a little perseverance and 6 runs through the Grand Caliber, it worked!! My excitement made up for my disappointment in the fact that the Curved, Scalloped, and Bracket borders are all only 6 " long and I make most of my cards 5X7. I need to send a strongly suggestive message to Stacey over at Spellbinders. But I digress. Where was I? Oh yes, die cutting two layers. To make things even trickier, because my card is 7", I had to shift the trellis die after the first cut was complete, line it up perfectly and run it through again several times to get the last inch cut.


For the top label, I used the peach coloured gelato and a baby wipe to create the light peach tone on white c/s before stamping the image. Then after die cutting, I decided it all needed the colour to be a bit more saturated, so I sponged on some VersaMagic pumpkin spice on the edges and over the center section.


The little flowers on the bow are a retired item from Stampin'Up! that only came in ivory, so I coloured them using my aqua brush and some dye ink that I applied onto a craft sheet using the Marvy ink pad. I attached them to the bow with Ultimate glue. Sorry about the photo. Focus, girl, focus.


And, of course, the inside.

I am still not completely thrilled with the finished product and may give this one more try, though I am running out of time for the deadline.


Stamps: JRS Celebrate Today Vintage Labels.
Papers: Graphic 45 Secret Garden, Bazzil red and blue c/s, SU white c/s.
Dies: JRS Vintage Labels 4, SB Floral Ovals, Classic Ovals, Fancy Lattice
Inks: Ranger Distress Broken China, VersaMagic pumpkin spice and cranberry, Marvy light orange.
Other: SU white satin ribbon, SU ribbon flowers, Ultimate glue, 3M foam tape, Zots glue dots.


Monday, January 20, 2014

A Bunch Of Juliet

Today I worked with a fun die from Heartfelt Creations called Sweet Juliet. The first time I saw it, I could not figure it out but now I adore the unique blossoms it makes. I think one of the things I like about it is you don't have to stamp something first, and then line up the die properly. Just lay the die on the paper and run it through the machine.


All the patterned papers I used (which is all the papers in the project) are also from HFC. I may have mentioned in the past how much I love them. The collections I used are listed below. Even the blossoms were made from patterned paper. Some of the lighter petals are from the same paper as the top mat with the words; you really can't tell when they are put together and it gives such nice texture to them.

If you look closely, you will see that I used 3 different types of brads. Also, the flowers where adhered in two different ways. On the back of the larger ones, I attached a square of foam tape with Zip glue, then used more Zip on the foam square to glue it to the card. The smaller blossoms were adhered with Diamond Glaze.

I dug out a set of dies that I have not used in a very long time, but that seemed very suited to the style of the card.

As you can see, I did not do much stamping on this one. I hope you like it anyway.


On the right, you can see the inside of the card.


Stamps: HFC Heartfelt Expressions
Papers: HFC Antiquity, Recollections Card Base, Stampin'Up! ivory, I also used some retired HFC             paper for the green bits.
Dies: Spellbinders deckled rectangles, HFC Sweet Juliet.
Ink: Memento eggplant.
Other: Stampin'Up! and Graphics 45 and Spare Parts brads, Diamon Glaze, Foam Tape.


Saturday, January 18, 2014

One For The Mail

Yes indeedy, I decided to make a card the would go through the mail in a regular envelope with no extra postage. This is hard for those of us who are addicted to our embellishments.


Once again I went to my favorite papers with the Heartfelt collections. And I decided to stay with HFC all the way.

There is not much to explain here. I did smudge the greeting the first time I stamped it and that led to an opportunity to improve the overall design with the oval die cuts.

I just got a parcel in the mail from HFC, with some of their newest papers, stamps and dies. So I suspect you will see something with these products. Meanwhile, take some time to get your fingers inky.

Stamps: HFC Heartfelt Expressions.
Papers: Recollections card base, Stampin'Up! ivory, HFC burst of splendor.
Dies: HFC decorative lattice swirl, Spellbinders classic ovals.
Ink: Archival coffee